
If there is anything around here that we have too much of, it's probably yarn. (That can't be a bad thing though, right?) Even the girls have their own bags and boxes of yarn to do with as they please.
Lately the youngest has been making cute little creations with her yarn and spent one day making yarn dolls to play with. Hers were really cute, but didn't last the day after all that playing.
So being the good mommy I am, I went online (what did we do before internet??) and found these directions for an improved yarn doll that should last for awhile.
|
Make the Body:
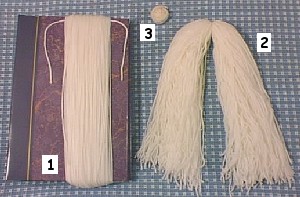
- Using the color you have chosen for the doll’s body, cut a piece of yarn approx. 6 inches long to be the tie and lay it across the top edge of the large book. Wrap yarn around the book as shown in the photo at #1. Continue winding yarn around the book 200 times.
- Slip the wound yarn off the book and tie the 6 inch piece of yarn tightly around the wound yarn.
- Cut the opposite end of the wound yarn where it bends, so that you have what is shown in the photo at #2.
- Make a yarn ball that is approx. 1 inch in diameter. See the photo at #3.
Make the Arms:
- Using the Medium book, wind the yarn around it as you did for the body, but only 50 times. (You will NOT need to place a tie along the top of the book)
- Slip the yarn off the book and cut along the bottom bend of the wound yarn.
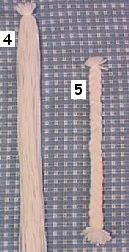
- Tie together one end of the yarn, as shown in the photo at #4, about 1/2 inch from the edge.
- Braid the entire length of the yarn and tie together again, at about 1/2 inch from the edge. (Trim if necessary)
Assemble the Body:
- Take the yarn ball and place it inside the yarn body, under the gathered, tied center.
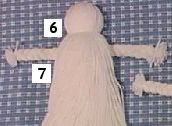
- Smooth out the yarn evenly around the ball and gather it together under the ball. Tie the yarn together tightly to form the head. See the photo at #6.
- Divide the yarn below the head into two parts, front and back.
- Center the braided arm piece between the two parts as shown in the photo at #7.
- Tie the yarn together tightly under the arms to form the upper body.
- Divide the remaining yarn into two parts, left and right.
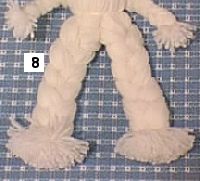
- Braid each side, gathering and tying the ends about 3/4 inch from the ends. See photo at #8. (Trim if necessary)
Create the Hair:
- To make the hair, use the Small book and place a 4 inch piece of yarn across the top edge of the book as you did for the body.
- Wind the yarn around 50 times.
- Slip the wound yarn off the book and tie the yarn together tightly with the 4 inch piece of yarn.
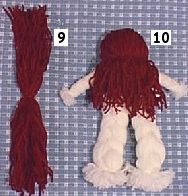
- Cut the opposite end of the wound yarn along the bend so that you will have cluster of long strands, tied in the middle. See photo at #9.
- Place the hair over the head with the gathered tie centered at the top.
- Use a doll maker’s needle and the hair color yarn to carefully, sew the hair in place at the top.
- Bring the needle and yarn down to one of the sides of the neck. (This should be done by sending the needle through the inside of the doll's head.)
- Loosely stitch over a small segment of the yarn hair along the neck, then another segment, then another, and so on until you reach the other side of the neck and the hair is secured evenly across the back of the neck as shown in the photo at #10.
- Tie off the end of your stitching yarn under the hair where it is concealed.
- Stitch a simple face using embroidery floss or you could even glue ready-made doll eyes and mouth on.
Done!
What have you been up to this week?Do you have something to share? Let us know what you’re working on this week! It can be photos of a project, instructions, recipes, or anything else you feel is "crafty". If you have something to share with us on your blog, add your link to the current week's party. Just please be sure to:
- Add the permalink to the specific blog post, not your general blog address in the linky form below (need help with finding the permalink? (click here to see a great post Darcy wrote on this!)
- Include in your blog entry a link back to the party post on this blog so that your readers can come and see what everyone else is working on today and have an opportunity to contribute! You can use the code below to add the button to your posts or blog if you'd like.
- Visit as many of the other participants as possible and leave comments! That’s what makes a party fun!! You don't want to come to a party and have no one talk to you!
If you want to play along don't forget to grab a button to place at the top or bottom of your post to show you are participating in Crafty Fridays!
Simply copy the code below in the box and paste where you can edit the html in your blog post.


How cute! I remember making something like this when I was a little girl. I believe it was holiday crafting done with my mother. We made a Mr and Mrs Santa Claus.
ReplyDeleteThanks so much for hosting and allowing us to share here! Enjoy your weekend!
ReplyDeleteThanks for sharing this - really cute & seem easy to make!
ReplyDelete免費視頻找女人聊天聖愛天堂網聊天室免費線上夫妻視訊聊天色成人情免費小說夫妻娛樂網站
ReplyDelete美女全裸視頻遼河聊吧視頻聊天室隨機視頻聊天裸聊室同城床友交友日本毛片視頻在線觀看
製作視頻的免費軟件人人免費在線聊天室極品美女視頻語音裸聊日本三級色情片sm交友聊天室
FC2免費共享視頻鶴聊聊天室珍愛視頻社區聊天室金瓶梅三級片在線觀看blondbunny mfc視訊
免費聊天視頻免費祼聊聊天室就愛視頻多人聊天室日本毛片日本成人電影美國視訊網站 mfc
免費成人視頻在線鶴聊文字網愛色視頻聊天室三級色情黃網站漁網襪misslawrara mfc視訊
免費視頻找女人聊天愛車聊天室色裸聊直播間毛片快播下載愛毛片成人電影網mfc視訊是什麼
視頻下載網站免費私密自拍視頻通道就聊愛聊視頻聊天室長腿美女跳小蘋果視頻mfc視訊聊天
聊天室VIP破解版cc聊視頻聊天室秀色激情秀聊天室快播成人影片商務模特網mfc視訊下載
國外視頻網站聊聊語音聊天網美女裸聊視頻互動黃色小說網日本毛片在線觀看mfc視訊 ptt